Warning
The CRC will officially retire AFS in May, 2027.
XSEDE
What is XSEDE?
The Extreme Science and Engineering Discovery Environment(XSEDE) is a powerful collection of virtual resources and a way for scientists and researchers alike to interactively share resources and expertise. XSEDE provides an SSO ( Single Sign On ) Hub for access to several national computing clusters. You must have an XSEDE account in order to use XSEDE’s resources.
Using XSEDE’s resources
The easiest way to access XSEDE’s resources is through its SSO (Single Sign On) login hub. Once you sign onto this hub, you can access the clusters that XSEDE provides (assuming your XSEDE account has the proper clearance) without additional credentials. Using the SSO is easy, to connect to it use any SSH client you like (Linux and Mac users can use their terminal and Windows users can download MobaXterm).
DUO authentication
To use the SSO and other features, you will need to enroll in DUO authentication. Please be sure you already have an XSEDE account before attempting any of the following tips.
First sign into XSEDE’s user portal located here.
Find the tab towards the top labeled “Profile” and click on it.
On the right hand side of the page, there will be the DUO logo and a link to enroll in DUO. Follow the steps on screen and setup a DUO token to be used with XSEDE.
Once you finish enrolling your DUO token, you can now have secure access to XSEDE’s SSO login node.
SSH into Login Hub
Note
You must enroll in DUO authentication to use the SSO / Login Hub !
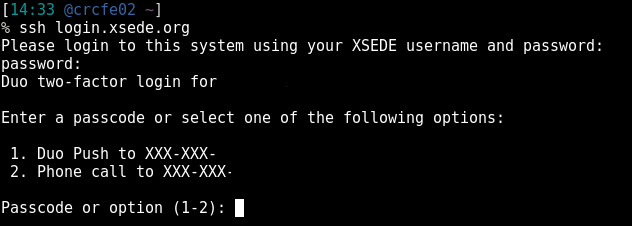
Once you have access to an SSH client, you can login to XSEDE.
The first step is to type:
ssh Your_XSEDE_User_Name@login.xsede.org
Your ssh client may give you a warning about connecting to this server, if so, type yes and press Enter.
You will then be prompted for your XSEDE password, this is the same one you used when you created your XSEDE account. Note: You will not see anything as you type in your password, this is a security feature.
XSEDE will then present you with some options for DUO. Pick the desired action. See Below
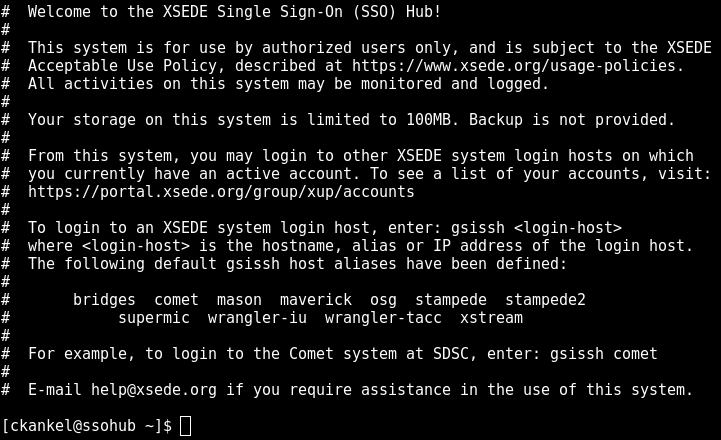
Once you are logged on, XSEDE will display the MOTD(message of the day) with some system information and tips for logging into its resources. If you want to see this message again, type:
cat /etc/motd
Once you login to the SSO Hub, you will receive an X.509 certificate *which will give you 12 hours before your session ‘expires’ and you will have to logout* of the SSO hub and log back in, even if you are using one of the XSEDE’s resources (i.e. Stampede, Comet, etc). You can see your remaining time left with the following command:
grid-proxy-info
GSISSH into Clusters
To access super-computing clusters through XSEDE, your account must have the ‘clearance’ to login to a specific cluster. Go to the XSEDE website and login, there you will see what clusters you have access to under My XSEDE Resources. If you have access to a cluster, you can login to it through the XSEDE SSO without being required to enter extra credentials. The protocol used to gain access to these clusters is gsissh, which is gsi-enabled ssh. It operates in a similar manner as ssh–for us, the user, we won’t notice a difference. Scroll below to find the specific cluster you’re looking for, if it is not found within this page you can visit XSEDE’s user Guides and click on the cluster you’re trying to access for more information.
To get a quick overview of all possible systems the XSEDE SSO can connect to, type: xsede-gsissh-hosts. Note that you must have access to a cluster before logging into it.
[UserName@ssohub ~]$ xsede-gsissh-hosts

bridges

comet

mason

osg

rmacc-summit

stampede

stampede2

supermic

wrangler-iu

wrangler-tacc

xstream
Stampede
Note
Stampede has reached its 4 year life cycle and the cluster is retiring. For continued use of TACC resources, Stampede-2 must be used. Login will be disabled starting April 2, 2018 and Stampede2 will no longer provide temporary read-only mounts of the Stampede1 home and scratch file systems.**
To assist in the transfer from Stampede to Stampede-2, please see the Transition Guide.
Stampede-2
Stampede-2 is the new flagship supercomputer at Texas Advanced Computing Center (TACC). After April 2, 2018, Stampede-2 will be the only Stampede system available.
Stampede-2’s initiation consisted of two infrastructure implementation phases. Phase 1 included 4,200 KNL (Knights Landing) compute nodes with:
Intel Xeon Phi 7250 with 68 cores on a single socket
4 hardware threads per core totaling 272 threads on a single node
96 GB of DDR4 RAM in addition to 16GB high speed MCDRAM. See Programming Notes for more info.
Phase 2 included 1,736 SKX nodes consisting of:
Intel Xeon Platinum 8160 “Skylake” processors with 48 cores on each node with a clock-rate of 2.1 GHZ.
192 GB of RAM per node
132 GB in /tmp on a SSD
Both Phase 1 and Phase 2 include a 100GB/sec Intel Omni-Path (OPA) network. Large memory nodes are expected to arrive in 2018. There are currently no plans for GPU systems in Stampede-2.
Logging into Stampede-2
To access Stampede-2 through XSEDE’s SSO, simply enter gsissh stampede2. Note that you must have an allocation with Stampede to login to the supercomputer. If you could access Stampede, you should be able to access Stampede-2. To find more information on Stampede-2, see TACC’s User Guide.
Submitting a batch job on Stampede-2
Stampede’s policy asks that jobs are not ran on the front-end nodes. So jobs must be submitted through a batch system. Stampede-2 uses SLURM as its job scheduler. To submit a job to SLURM, you can do the following:
Just like using the CRC’s resources, to submit a job on Stampede, you must create a job submission script. As Stampede-2 is a large machine with many users, there are a few different configurations for job submission scripts depending on the type of job to be ran.
A serial job, a job meant to run only on one core on a machine, could be created with the following job script:
#!/bin/bash
#----------------------------------------------------
#SBATCH -J myjob           # Job name
#SBATCH -o myjob.o%j       # Name of stdout output file
#SBATCH -e myjob.e%j       # Name of stderr error file
#SBATCH -p normal          # Queue (partition) name
#SBATCH -N 1               # Total # of nodes (must be 1 for serial)
#SBATCH -n 1               # Total # of mpi tasks (should be 1 for serial)
#SBATCH -t 01:30:00        # Run time (hh:mm:ss)
#SBATCH --mail-user=myname@myschool.edu
#SBATCH --mail-type=all    # Send email at begin and end of job
#SBATCH -A myproject       # Allocation name (req'd if you have more than 1)

# Other commands must follow all #SBATCH directives...
module list
pwd
date
# Launch serial code...
./mycode.exe         # Do not use ibrun or any other MPI launcher
# ---------------------------------------------------
An example of a KNL MPI job could be as follows:
#!/bin/bash
#----------------------------------------------------
#SBATCH -J myjob           # Job name
#SBATCH -o myjob.o%j       # Name of stdout output file
#SBATCH -e myjob.e%j       # Name of stderr error file
#SBATCH -p normal          # Queue (partition) name
#SBATCH -N 4               # Total # of nodes
#SBATCH -n 32              # Total # of mpi tasks
#SBATCH -t 01:30:00        # Run time (hh:mm:ss)
#SBATCH --mail-user=myname@myschool.edu
#SBATCH --mail-type=all    # Send email at begin and end of job
#SBATCH -A myproject       # Allocation name (req'd if you have more than 1)

# Other commands must follow all #SBATCH directives...
module list
pwd
date

# Launch MPI code...
ibrun ./mycode.exe         # Use ibrun instead of mpirun or mpiexec
# ---------------------------------------------------
To see more examples of job submission scripts and other tips and tricks, see the sbatch guide on TACC’s User Guide.
Job Submission and Monitoring
Once your submission script is created, you can submit it to SLURM. You do this by typing the following command:
sbatch my_job_script_name
There are a two different options for checking on the status of your jobs.
* The first option is to use squeue by typing squeue -u $USER.
* The second option is to use showq by typing showq -u.
To see more options on job monitoring view the Job Monitoring section of the Stampede-2 User Guide.
For more information on Stampede-2, visit TACC’s Stampede-2 page.
Comet
Comet is a dedicated XSEDE cluster with 1,984 total compute nodes which can reach ~2.0 petaflops designed by Dell. The compute nodes contain Intel Xeon E5-2680v3’s, 128 GB of RAM, and 320 GB of local scratch memory. There are GPU nodes that have 4 NVIDIA GPU’s per each GPU node. There are also large memory nodes which contain 1.5 TB of RAM with 4 Intel Haswell processors each. The cluster uses CentOS as the OS and SLURM (just like Stampede) as the batch environment. Comet provides Intel, PGI, and GNU compilers.
Logging into Comet through SSO
Comet can be accessed through XSEDE’s SSO. Once logged into the SSO, you can access the Comet cluster through the following command:
gsissh comet.sdsc.xsede.org
If you have clearance to be on Comet, you will now be on a front-end for Comet.
For more information on the Comet cluster, visit XSEDE’s Comet Page.
Submitting Jobs to Comet
The Comet cluster, like the CRC, has many compute nodes which can have jobs ran across them. In order to manage this, just like Stampede, Comet uses SLURM as a resource manager. This means in order to properly submit a job to the Comet cluster, you must create and submit a ‘Job Submission Script’ to have your job properly ran across the compute nodes.
Sample SLURM jobscripts
For a basic MPI job, a submission script may look like the following:
#!/bin/bash
#SBATCH --job-name="hellompi"
#SBATCH --output="hellompi.%j.%N.out"
#SBATCH --partition=compute
#SBATCH --nodes=2
#SBATCH --ntasks-per-node=24
#SBATCH --export=ALL
#SBATCH -t 01:30:00

#This job runs with 2 nodes, 24 cores per node for a total of 48 cores.
#ibrun in verbose mode will give binding detail

ibrun -v ../hello_mpi
For an OpenMP Job, a base submission script would look like:
#!/bin/bash
#SBATCH --job-name="hello_openmp"
#SBATCH --output="hello_openmp.%j.%N.out"
#SBATCH --partition=compute
#SBATCH --nodes=1
#SBATCH --ntasks-per-node=24
#SBATCH --export=ALL
#SBATCH -t 01:30:00

#SET the number of openmp threads
export OMP_NUM_THREADS=24

#Run the job using mpirun_rsh
./hello_openmp
Within these submission scripts, you would need to change the job names to match that of your executable you want to run, and the output files to the names you are need.
Operating SLURM
SLURM is a resource manager and like the CRC, it has queues for job submissions. SLURM within Comet has 5 queues:
Name         Max Wall Time          Max Nodes
compute:         48 hours               72
gpu:             48 hours                4
gpu-shared:      48 hours                1
shared:          48 hours                1
large-shared:    48 hours                1
For more examples of the GPU nodes, while logged onto Comet please see /share/apps/examples/GPU.
Job Management
To monitor your jobs in SLURM, you can view them with the squeue command:
squeue -u user_name
squeue can take the following options:
-i interval        Repeatedly report at intervals (in seconds)
-i job_list     Displays information for specified job(s)
-i part_list    Displays information for specified partitions (queues)
-i state_list   Shows jobs in the specified state(s)
To cancel a submitted job, you can use the scancel command such as:
[user@comet-ln1 ~]$ scancel jobid
Comet SLURM Help
For more information regarding SLURM and Comet, visit XSEDE’s Comet page.