Warning
The CRC will officially retire AFS in May, 2027.
CRC Open WebUI User Guide
1. CRC Open WebUI GenAI Platform
1.1. Signing up on the CRC Open WebUI GenAI Platform
The Center for Research Computing (CRC) launched a GenAI platform in December 2024 for faculty, students and staff of the ND community.
This platform supports many large language models (LLMs), utilizing systems resources, such as, servers, memory, GPUs; software resources such as, stable OS, frameworks, libraries; network resources including wide bandwidth, firewalls and other resources.
You can sign up on the CRC Hosted Open WebUI Platform (on campus or VPN, Notre Dame Google login required).
1.2. About the CRC Open WebUI GenAI Platform
The CRC GenAI integrated platform leverages the Open WebUI application. Open WebUI (OWUI) is an extensible, feature-rich, and user-friendly AI platform that supports various Large Language Model (LLM) runners like Ollama and OpenAI-compatible APIs, with a built-in inference engine for Retrieval-Augmented Generation (RAG). Refer to the Open WebUI documentation for more information.
Users can have certain features enabled for them individually, or preferrably as groups, on the platform, if they request.
1.3. About the CRC Open WebUI User Guide
Why this Guide?
Considering the queries received on issues and challenges in accessing the CRC Open WebUI through an API or using the CRC Open WebUI programmatically, we prepared this guide. The guide is comprehensive even to users with little programming experience.
Brief Description of this User Guide
The following Sections comprise a comprehensive guide on using your Open WebUI API key to access models on the CRC hosted Open WebUI GenAI platform, from the command prompt or a suitable integrated development environment (IDE). The examples are written in two programming languages: shell (Sections 2 to 5, and 10 to 12) and python (Sections 6 through 13).
This command line interface (CLI) guide is intended for users that need more control in using the models, for. e.g., accessing other keys in a chat response, other than the content.
These codes can be run on IDEs such as Google Colab, Jupyter Lab, Visual Studio Code, etc.
More details of interacting with models via API access to Open WebUI can be found here:
2. Accessing Open WebUI with an API
2.1. API Key Access and Storage
The steps in obtaining your API key from the GUI are as follows:
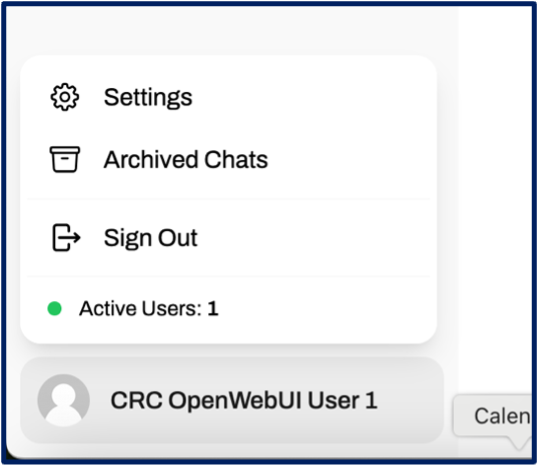
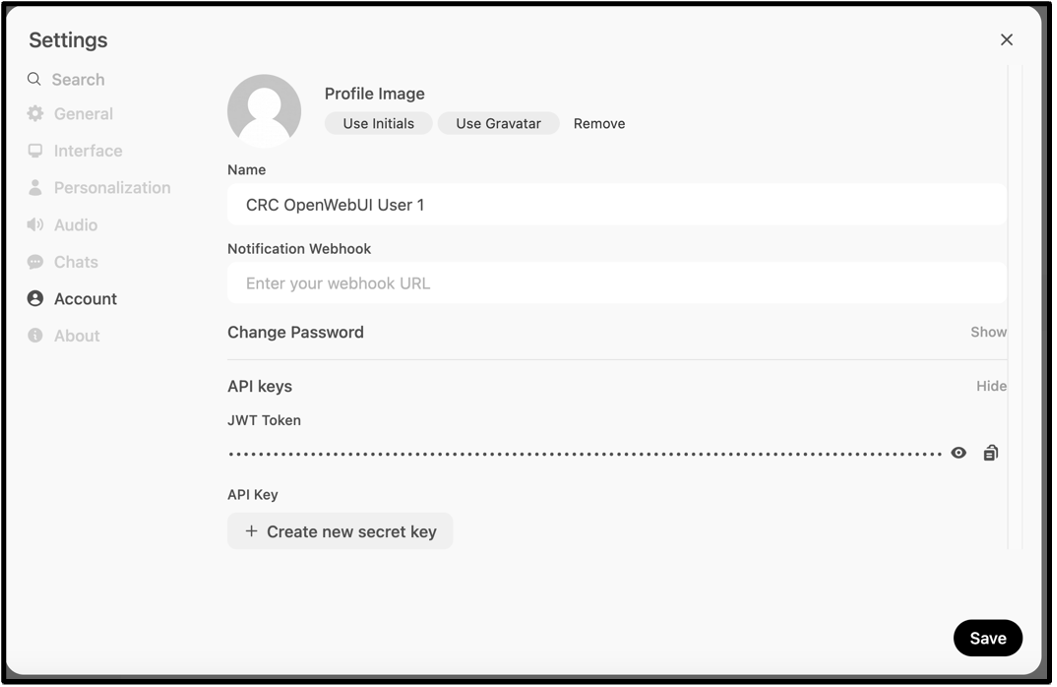
Step 1: Obtain your API key from Settings > Account on the CRC Hosted Open WebUI application
Generate / fetch your Open WebUI API
Step 2: Create an environmental file on your main project directory with the following content, and append your Open WebUI API key. The filename must start with a dot.
Filename: .env
# .env
 MY_OPEN_WEBUI_API_KEY="sk-…”
Step 3: Include the environmental file as follows from the command line:
source .env
Step 4: Curl at the url path and list available models as follows from the command line:
Note
Beware of invisible extra spaces in your commands which can cause errors in your shell commands.
curl -s -H "Authorization: Bearer ${MY_OPEN_WEBUI_API_KEY}" https://openwebui.crc.nd.edu/api/models | jq '.data[].name'
You may have to install the tool – ‘jq’ if required. You can do a brew install on mac.
Note
brew install jq
3. API Use in Shell
3.1. Querying a model
The following is a code block for chatting with a model
source .env
curl -X POST https://openwebui.crc.nd.edu/api/v1/chat/completions \
-H "Authorization: Bearer ${MY_OPEN_WEBUI_API_KEY}" \
-H "Content-Type: application/json" \
-d '{
    "model": "codellama:70b",
    "messages": [
    {
        "role": "user",
        "content": "write python codes for calculating the mean squared error of two vector inputs of numbers"
    }
    ],
    "temperature": 0.7
}'
You could also use variables as follows:
source .env
chosen_model="phi4:latest"
my_query="Narrate a brief history of Canada"
my_response=$(curl -X POST https://openwebui.crc.nd.edu/api/v1/chat/completions \
-H "Authorization: Bearer ${MY_OPEN_WEBUI_API_KEY}" \
-H "Content-Type: application/json" \
-d '{
    "model": "'"${chosen_model}"'",
    "messages": [
    {
        "role": "user",
        "content": "'"${my_query}"'"
    }
    ],
    "temperature": 0.8
}')
echo $my_response
Note
To avoid errors, the model must exist in your models’ list, and the name must be correct.
4. Document Uploads and File Ids Retrieval from the Command Line (CLI)
The process of uploading your documents converts your documents of any type into JSON format. If you choose not to upload your documents but rather do Retrieval-Augmented Generation (RAG) directly with your documents (either locally or remotely), then you will need to convert your documents to a format acceptable to the Open WebUI API. See section 10 on more about this.
4.1. Directory for RAG documents
It makes sense to create a folder for your documents for RAG.
Step 1: Create a directory named for e.g. ‘myragdocuments’
mkdir myragdocuments
Step 2: Place your files intended for RAG in the folder - ‘myragdocuments’.
4.2. Single document upload
source .env
curl -X POST -H "Authorization: Bearer ${MY_OPEN_WEBUI_API_KEY}" -H "Accept: application/json" \
-F "file=@myragdocuments/firstfile.docx" \
https://openwebui.crc.nd.edu/api/v1/files/
Note
Ensure you overwrite all instances of the filename ‘firstfile.docx’ with your filename
4.3. Multiple documents upload
To upload multiple documents to a given URL do the following:
Step 1: Save the following to a file named ‘upload_files.sh’
File: ‘upload_files.sh’
#!/bin/bash

# API key
source .env

# Directory containing the files to upload
DIRECTORY="myragdocuments"

# API upoad endpoint
API_URL="https://openwebui.crc.nd.edu/api/v1/files/"

# Loop through each file in the directory and upload it
for file in "$DIRECTORY"/*; do
  if [ -f "$file" ]; then
    echo "Uploading $file..."
    curl -X POST -H "Authorization: Bearer ${MY_OPEN_WEBUI_API_KEY}" -H "Accept: application/json" \
    -F "file=@$file" $API_URL
  fi
done
Step 2: Make the file executable:
chmod +x upload_files.sh
Step 3: Run the file (must be preceded by a dot as shown)
./upload_files.sh
4.4. File ids Retrieval from the CLI
The files you uploaded are assigned file ids. You can retrieve the file ids and print them to the screen.
Step 1: Retrieve your file ids and store them in a variable. substitute the url in the code block with the actual URL.
source .env
myfile_ids=$(curl -H "Authorization: Bearer ${MY_OPEN_WEBUI_API_KEY}" url_path/ | jq -r '.[].id')
Step 2: Convert the file IDs to an array and print them to the screen
myfile_ids_array=($myfile_ids)
echo "Fetched file IDs: ${myfile_ids_array[@]}"
5. Retrieval Augmented Generation (RAG) from Shell
5.1. RAG using file uploads
An LLM, your query and your files are required for RAG. In these examples, you will retrieve your uploaded files from a given URL.
5.1.1. Choosing a model
Step 1: Curl at the url path and list available models as follows:
source .env
curl -s -H "Authorization: Bearer ${MY_OPEN_WEBUI_API_KEY}" https://openwebui.crc.nd.edu/api/models | jq '.data[].name'
Step 2:
You can either define your model and query right in the terminal or save them to a file. In this example, we are saving the model and query definitions to a file. If you choose to define your model and query right in the terminal, please remember to edit the file ‘do_rag.sh’ in Section 5.1.2.
If you prefer to save your model and query definitions to a file, then copy a model of your choice and overwrite “your_chosen_model”. Overwrite “your_query” with your preferred query in the following:
# chosen_model_and_query.sh
chosen_model="your_chosen_model"
query="Explain the concepts in this document."
Step 3: Create a file named ‘model_and_query.sh’ with the modified content above
Step 4 Make the file executable:
chmod +x model_and_query.sh
5.1.2. RAG with all documents IDs
The following shell block of codes loads your API key, your model and query definitions, fetches all your file ids, and does RAG on your file contents using your query and chosen model. It saves the output to a file named ‘myragoutput.txt’.
You can create a shell file and save the codes to the file, then run the file.
Step 1 Save the shell codes to a file named ‘do_rag.sh’
File: do_rag.sh
#!/bin/bash

# API key
source .env

# model choice and query
source model_and_query.sh

myfile_ids=$(curl -H "Authorization: Bearer ${MY_OPEN_WEBUI_API_KEY}" https://openwebui.crc.nd.edu/api/v1/files/ | jq -r '.[].id')
myfile_ids_array=($myfile_ids)
chosen_model="gpt-oss:latest"
output_file="myragoutput.txt"

files_json=""
for file_id in "${myfile_ids_array[@]}"
do
    files_json+="{\"type\": \"file\", \"id\": \"${file_id}\"},"
done

# Remove trailing comma
files_json=${files_json%,}

response=$(curl -X POST https://openwebui.crc.nd.edu/api/v1/chat/completions \
-H "Authorization: Bearer ${MY_OPEN_WEBUI_API_KEY}" \
-H "Content-Type: application/json" \
-d '{
    "model": "'"${chosen_model}"'",
    "messages": [
        {"role": "user", "content": "'"${your_query}"'"}
        ],
    "files": [
        '"${files_json}"'
        ]
    }')

echo "$response" > "$output_file"
Step 2 Make the file executable:
chmod +x do_rag.sh
Step 3 Run the file (must be preceded by a dot as shown)
./do_rag.sh
Step 4 Open the file ‘myragoutput.txt’ for your results.
cat myragoutput.txt
5.1.3. RAG with select document IDs
The following shell codes loads your API key, your model and query definitions, and does RAG on your specific file contents using your query and chosen model. It saves the output to a file named ‘myoutput.txt’.
File: select_ids_rag.sh
#!/bin/bash

your_query="Explain the concepts in these documents."
selected_file_ids=("file_id_1" "file_id_2" "file_id_3") # Add as many file IDs as needed

# API key
source .env

# model choice and query
source model_and_query.sh

output_file="myoutput.txt"

files_json=""
for file_id in "${selected_file_ids[@]}"
do
    files_json+="{\"type\": \"file\", \"id\": \"${file_id}\"},"
done

# Remove trailing comma
files_json=${files_json%,}

response=$(curl -X POST https://openwebui.crc.nd.edu/api/v1/chat/completions \
-H "Authorization: Bearer ${my_api_key}" \
-H "Content-Type: application/json" \
-d '{
"model": "'"${chosen_model}"'",
"messages": [
    {"role": "user", "content": "'"${your_query}"'"}
    ],
"files": [
    '"${files_json}"'
    ]
}')

echo "$response" > "$output_file"
6. API Use in Python
6.1. Required Libraries and Imports
Certain libraries are required for the API use in Python environment. The following guide prepares the user to make API calls from the python environment.
Step 1 Ensure that your API key is already stored in your environmental file. Refer to the Section here on this if you have not done so.
Ensure that the dot_env and requests libraries are installed. You can install them using pip if required:
pip install python-dotenv
pip install requests
Step 2 Import your libraries
import os
import requests
import json
from dotenv import load_dotenv

# Load the API key from the .env file
load_dotenv()
api_key = os.getenv("MY_OPEN_WEBUI_API_KEY")
6.2. Models’ Listing in Python
It is helpful to list models available to you before using them. Models can be listed in python by doing the following:
Step 1
Create a new file named listmodels.py and copy the following python codes to it.
File: listmodels.py
# List available models
import os
import requests
from dotenv import load_dotenv

# Load the API key from the .env file
load_dotenv()
api_key = os.getenv("MY_OPEN_WEBUI_API_KEY")

# Check API key availability and validity
def check_api_key(api_key):
    if not api_key:
        print("API key is not available. Please set the MY_OPEN_WEBUI_API_KEY environment variable.")
        return False
    return True

# List available models
def list_models():
    if not check_api_key(api_key):
        return

    url = "https://openwebui.crc.nd.edu/api/models"
    headers = {"Authorization": f"Bearer {api_key}"}
    response = requests.get(url, headers=headers)

    if response.status_code == 200:
        models = response.json().get('data', [])
        for model in models:
            print(model['name'])
    elif response.status_code == 401:
        print("Invalid API key. Please check your API key and try again.")
    else:
        print("Failed to retrieve models. Status code:", response.status_code)

if __name__ == "__main__":
    list_models()
Step 2
Call the function from python
from listmodels import *
list_models()
Or run the file from the terminal
python listmodels.py
Or run from Jupyter notebook, Google Colab
!python listmodels.py
7. Chatting with Models in Python
7.1. Function definition
The following comprise a basic python code block for querying a model.
# Interact with the model
def interact_with_model(chosen_model, my_query):
    url = "https://openwebui.crc.nd.edu/api/v1/chat/completions"
    headers = {"Authorization": f"Bearer {api_key}", "Content-Type": "application/json"}
    payload = {
        "model": chosen_model,
        "messages": [{"role": "user", "content": my_query}],
    }
    response = requests.post(url, headers=headers, data=json.dumps(payload))
    if response.status_code == 200:
        print(response.json())
    else:
        print("Failed to interact with the model")
7.2. Function calling
The function can be called as follows:
chosen_model = "gpt-oss:latest"
my_query = "Narrate a brief history of America"
interact_with_model(chosen_model, my_query)
To avoid errors, the model must exist in your models’ list, and the name must be correct.
8. Document Uploads in Python
The process of uploading your documents converts your documents of any type into JSON format. If you choose not to upload your documents but rather do Retrieval-Augmented Generation (RAG) directly with your documents (either locally or remotely), then you will need to convert your documents to a format acceptable to the Open WebUI API. See section 10 on more about this.
It is however, recommended that you upload your files for RAG.
8.1. Directory for RAG documents
It is good practise to create a folder for your documents for RAG.
Step 1: Create a directory named for e.g. ‘myragdocuments’
Step 2: Place your files intended for RAG in the folder - ‘myragdocuments’.
8.2. Multiple documents upload
The following python code block uploads documents from your folder named ‘‘myragdocuments’’ to api_url provided in the codes.
Step 1: Save the following to a file named ‘uploadfiles.py’
File: ‘uploadfiles.py’
import os
import requests
from dotenv import load_dotenv

# Load the API key from the .env file
load_dotenv()
api_key = os.getenv("MY_OPEN_WEBUI_API_KEY")

# Directory containing the files to upload
directory = "myragdocuments" # default directory

# API upoad endpoint
api_url = "https://openwebui.crc.nd.edu/api/v1/files/"


# Loop through each file in the directory and upload it
def upload_files(directory):
    if not os.path.exists(directory):
        print(f"Directory '{directory}' does not exist.")
        return

    files_found = False
    for file_name in os.listdir(directory):
        file_path = os.path.join(directory, file_name)
        if os.path.isfile(file_path):
            files_found = True
            print(f"Uploading {file_path}...")
            with open(file_path, "rb") as file:
                response = requests.post(
                    api_url,
                    headers={
                        "Authorization": f"Bearer {api_key}",
                        "Accept": "application/json",
                    },
                    files={"file": file},
                )
                if response.status_code == 200:
                    print(f"Uploaded {file_path} successfully!")
                else:
                    print(
                        f"Failed to upload {file_path}. Status code: {response.status_code}"
                    )

    if not files_found:
        print(f"No files found in the directory '{directory}'.")


if __name__ == "__main__":
    upload_files(directory)
Step 2
Call the main function from python
from uploadfiles import *
directory = "myragdocuments"
upload_files(directory)
Or run the file from the terminal
python uploadfiles.py
Or run from Jupyter notebook, Google Colab
!python uploadfiles.py
9. RAG using file uploads in Python
An LLM, your query and your files are required for RAG. In these examples, you will retrieve your uploaded files from a given URL.
The files you uploaded are automatically asigned file ids. During RAG the file Ids will be retrieved in the python codes in ‘do_rag.py’.
9.1. Choosing a model
list your models as shown in the Section 6.2. here.
9.2. RAG using all file Ids
The following python block of codes loads your API key, your model and query definitions, fetches all your file ids, and does RAG on your file contents using your query and chosen model. It saves the output to a file named ‘myragoutput.txt and also returns a JSON dictionary object when the main function is called.
When you call the python file you should pass your chosen model and query as arguments.
Step 3: Create a file named “do_rag.py” and paste the following python codes
import os
import requests
import json
from dotenv import load_dotenv

# Load the API key from the .env file
load_dotenv()
api_key = os.getenv("MY_OPEN_WEBUI_API_KEY")

# Define default variables for model and query
chosen_model = "granite4:tiny-h" # default
your_query = "Summarize each document in less than four words." # default


# Check API key availability and validity
def check_api_key(api_key):
    if not api_key:
        print(
            "API key is not available. Please set the MY_OPEN_WEBUI_API_KEY environment variable."
        )
        return False

    # Test the API key with a simple request
    test_url = "https://openwebui.crc.nd.edu/api/v1/files/"
    headers = {"Authorization": f"Bearer {api_key}"}
    response = requests.get(test_url, headers=headers)

    if response.status_code == 200:
        return True
    elif response.status_code == 401:
        print("Invalid API key. Please check your API key and try again.")
        return False
    else:
        print(f"Failed to verify API key. Status code: {response.status_code}")
        return False


# Retrieve file IDs
def get_file_ids(api_key):
    url = "https://openwebui.crc.nd.edu/api/v1/files/"
    headers = {"Authorization": f"Bearer {api_key}"}
    response = requests.get(url, headers=headers)

    if response.status_code == 200:
        file_ids = [file["id"] for file in response.json()]
        print(file_ids)
        return file_ids
    else:
        print(f"Failed to retrieve files. Status code: {response.status_code}")
    return []


# Create JSON for files
def create_files_json(file_ids):
    files_json = [{"type": "file", "id": file_id} for file_id in file_ids]
    return files_json


# Upload files
def get_response(
    api_key, chosen_model, your_query, files_json, output_file="myragoutput.txt"
):
    url = "https://openwebui.crc.nd.edu/api/v1/chat/completions"
    headers = {"Authorization": f"Bearer {api_key}", "Content-Type": "application/json"}
    data = {
        "model": chosen_model,
        "messages": [{"role": "user", "content": your_query}],
        "files": files_json,
    }

    response = requests.post(url, headers=headers, data=json.dumps(data))
    response_text = response.text
    print(response_text)

    with open(output_file, "w") as file:
        file.write(response_text)


    # Return the response as a dictionary
    try:
        response_dict = response.json()  # Convert response text to dictionary
        return response_dict
    except json.JSONDecodeError:
        print("Failed to decode response as JSON.")
        return None


# Main function to call rag
def rag(chosen_model, your_query, output_file="myragoutput.txt"):
    if check_api_key(api_key):
        file_ids = get_file_ids(api_key)
        if file_ids:
            files_json = create_files_json(file_ids)
            response_dict = get_response(api_key, chosen_model, your_query, files_json, output_file)
            return response_dict  # Return the dictionary for further use
        else:
            print("No files found.")
            return None
    else:
        print("API key check failed.")
        return None


# Example calls to the rag function
if __name__ == "__main__":
    rag(chosen_model, your_query)
Step 4 Call the main function and pass your chosen model and query as arguments. Assign to a variable, ‘my_dict_response’
Option A:
From Python
from do_rag import *
new_model = "gpt-oss:latest"
new_query = "Summarize each document in less than ten words."
my_dict_response = rag(new_model, new_query)
The contents of the dictionary can be accessed as desired for example:
print(my_dict_response.keys())  # and further
print(print(my_dict_response['choices'][0]))
print(my_dict_response['choices'][0]['message']['content'])
Or you can display in markdown
from IPython.display import Markdown, display

my_dict_response = rag(new_model, new_query)
# Access the content field
content = my_dict_response['choices'][0]['message']['content']

# Display the content as Markdown
display(Markdown(content))
Option B:
Edit the model choice and query in the python file and run from the terminal
python do_rag.py
10. RAG with Local File Parsing: No Upload Required
10.1 Documents on your local or remote folders
The process of uploading your documents converts your documents of any type into JSON format. If you choose not to upload your documents but rather do Retrieval-Augmented Generation (RAG) directly with your documents (either locally or remotely), then you will need to convert your documents to a format the Open webUI API can handle.
If you prefer to upload your files then see section 4 on uploading files from shell and section 8 on uploading files in Python.
10.2. RAG via Embedded File Content in Shell
Step 1
If preprocessing an MS Word document in shell, you may need to have docx2txt installed. Do a brew install on Mac OS
brew install docx2txt
Step 2
Convert your document to txt
docx2txt myragdocuments/firstfile.docx > myragdocuments/firstfile.txt
Step 3
clear your document of white spaces while assigning the contents to a variable
encoded_content=$(cat myragdocuments/firstfile.txt | jq -Rs '.')
Step 4
Your modified codes for your local or remote documents not uploaded will then be:
source .env
chosen_model="cogito:32b"

newresponse=$(jq -n \
--arg model "$chosen_model" \
--arg summary "Summarize the contents ..." \
--arg content "$encoded_content" \
'{
    model: $model,
    messages: [{role: "user", content: ($summary + " " + $content)}]
}' | curl -X POST https://openwebui.crc.nd.edu/api/v1/chat/completions \
-H "Authorization: Bearer ${MY_OPEN_WEBUI_API_KEY}" \
-H "Content-Type: application/json" \
-d @-)

echo "$newresponse"
10.3. RAG via Embedded File Content in Python
You will need to install and import libraries for converting your documents to an acceptable JSON format.
These libraries will help pre-process your documents into a format that the API can handle. Since the Open WebUI API uses JSON payloads for communication.
To extract content from a Microsoft office file, or PDF file, you need to install python-docx and PyPDF2 or pdfplumber, respectively.
Note
# Install python-docx
pip install python-docx PyPDF2
The following python codes does retrieval augmented generation with Microsoft or PDF files locally stored in a folder named ‘myragdocuments’. It uses the python library named python-docx to all convert MS word files in the myragdocuments and uses PyPDF2 to convert all PDF files in the same myragdocuments folder to JSON format usable to the Open WebUI API.
Step 1
Save the following to new python file ‘process_dorag.py’
filename: process_dorag.py
import os
import json
from docx import Document
import PyPDF2
from dotenv import load_dotenv
import csv

# Load the API key from the .env file
load_dotenv()
api_key = os.getenv("MY_OPEN_WEBUI_API_KEY")

# Define default variables for model and query
chosen_model = "granite4:micro"  # default
your_query = "Summarize the contents ..."  # default


# Check API key availability and validity
def check_api_key(api_key):
    if not api_key:
        print("API key is not available. Please set the MY_OPEN_WEBUI_API_KEY environment variable.")
        return False
    return True  # Skip the online check


# Extract text from a Word document
def extract_text_from_docx(file_path):
    doc = Document(file_path)
    return "\n".join(paragraph.text for paragraph in doc.paragraphs)


# Extract text from a PDF document
def extract_text_from_pdf(file_path):
    text = ""
    with open(file_path, "rb") as file:
        reader = PyPDF2.PdfReader(file)
        text = "\n".join(page.extract_text() for page in reader.pages if page.extract_text())
    return text

def extract_text_from_csv(file_path):
    lines = []
    with open(file_path, newline='', encoding='utf-8') as csvfile:
        reader = csv.reader(csvfile)
        for row in reader:
            lines.append(", ".join(row))
    return "\n".join(lines)

# Create JSON from local files
def create_files_json(folder_path):
    files_json = []
    for file_name in os.listdir(folder_path):
        file_path = os.path.join(folder_path, file_name)
        if file_name.endswith(".docx"):
            content = extract_text_from_docx(file_path)
            files_json.append({"type": "file", "name": file_name, "content": content})
        elif file_name.endswith(".pdf"):
            content = extract_text_from_pdf(file_path)
            files_json.append({"type": "file", "name": file_name, "content": content})
    return files_json

# Send RAG request to the Open WebUI API
def get_response(api_key, chosen_model, your_query, output_file="myragoutput.txt"):
    url = "https://openwebui.crc.nd.edu/api/v1/chat/completions"
    headers = {"Authorization": f"Bearer {api_key}", "Content-Type": "application/json"}
    data = {
        "model": chosen_model,
        "messages": [{"role": "user", "content": your_query}]
    }

    response = requests.post(url, headers=headers, data=json.dumps(data))
    response_text = response.text
    print(response_text)

    with open(output_file, "w") as file:
        file.write(response_text)


# Main function to perform RAG
def rag(folder_path, chosen_model, your_query, output_file="myragoutput.txt"):
    if check_api_key(api_key):
        files_json = create_files_json(folder_path)
        if files_json:
            # Append file contents directly to the query string
            for file in files_json:
                your_query += f"\n\nContents of {file['name']}:\n{file['content']}"
            get_response(api_key, chosen_model, your_query, output_file=output_file)
        else:
            print("No valid files found in the folder.")


# Example call to the RAG function
if __name__ == "__main__":
    folder_path = "myragdocuments/"  # Folder containing the files
    rag(folder_path, chosen_model, your_query)
Step 2
Call the main function
from process_dorag import *
new_model = "mistral-small3.2:latest"
new_query = "Please summarize. "
directory = "myragdocuments"
rag(directory, new_model, new_query)
11. Deletion of Uploaded Files via Open WebUI API in Python & Shell
Managing uploaded files efficiently is essential for maintaining a clean and organized workspace within Open WebUI. This section walks through how to use authenticated shell scripts to list and delete uploaded files via the API upoad endpoint. We’ll cover both selective deletion by file ID and bulk deletion of all uploaded files, including examples with error handling and logging in both Python and shell.
11.1. Selective Deletion by file ID
Deleting specific uploaded files by referencing their unique file IDs.
11.1.1. Selective Deletion in Python
First of all list all file IDs
import os
import requests

# Load API key from environment
api_key = os.getenv("MY_OPEN_WEBUI_API_KEY")
if not api_key:
    raise EnvironmentError("Missing MY_OPEN_WEBUI_API_KEY in environment.")

# API upoad endpoint
url = "https://openwebui.crc.nd.edu/api/v1/files/"
headers = {"Authorization": f"Bearer {api_key}"}

# Fetch file metadata
response = requests.get(url, headers=headers)
if response.status_code != 200:
    raise RuntimeError(f"Failed to fetch files: HTTP {response.status_code}")

# Extract file IDs
file_data = response.json()
myfile_ids_array = [file["id"] for file in file_data]

print("Fetched file IDs:", myfile_ids_array)
This example code in Python sends authenticated DELETE requests for selected file IDs.
Replace the placeholder values in selected_ids with actual file IDs obtained from the API upoad endpoint.
import os
import requests

# Load API key from environment
api_key = os.getenv("MY_OPEN_WEBUI_API_KEY")
if not api_key:
    raise EnvironmentError("Missing MY_OPEN_WEBUI_API_KEY in environment.")

# Define the specific file IDs to delete
selected_ids = ["fileid1", "fileid2", "fileid3"]  # Replace with actual IDs

# API upoad endpoint base
base_url = "https://openwebui.crc.nd.edu/api/v1/files/"

# Loop through each file ID and attempt deletion
for file_id in selected_ids:
    url = f"{base_url}{file_id}"
    headers = {"Authorization": f"Bearer {api_key}"}

    response = requests.delete(url, headers=headers)

    if response.status_code == 200:
        print(f"✅ Successfully deleted {file_id}")
    elif response.status_code == 401:
        print(f"🔒 Authentication failed for {file_id} (HTTP 401)")
    elif response.status_code == 404:
        print(f"❌ File not found: {file_id} (HTTP 404)")
    else:
        print(f"⚠️ Unexpected error deleting {file_id} (HTTP {response.status_code})")
11.1.2. Selective deletion in Shell
This shell script loops through chosen file IDs and deletes them. Save the shell script as ‘delete_selected_files.sh’.
First of all access your file IDs. See section 4.4 on listing File IDs.
Replace the placeholder values in selected_ids with actual file IDs obtained from the API upoad endpoint.
Ensure your .env file contains a valid MY_OPEN_WEBUI_API_KEY before running the script.
Make the script executable using chmod +x delete_selected_files.sh.
Run the script from the terminal using ./delete_selected_files.sh.
file name: delete_selected_files.sh
#!/bin/bash

# Load environment variables
source .env

# Define the specific file IDs to delete
selected_ids=("fileid1" "fileid2" "fileid3")  # Replace with actual IDs

echo "Deleting selected file IDs: ${selected_ids[@]}"

for file_id in "${selected_ids[@]}"; do
echo "Deleting file ID: $file_id"

# Perform the DELETE request and capture HTTP status code
response=$(curl -s -o /dev/null -w "%{http_code}" -X DELETE \
    -H "Authorization: Bearer ${MY_OPEN_WEBUI_API_KEY}" \
    https://openwebui.crc.nd.edu/api/v1/files/$file_id)

# Evaluate response
if [ "$response" -eq 200 ]; then
    echo "✅ Successfully deleted $file_id"
elif [ "$response" -eq 401 ]; then
    echo "🔒 Authentication failed for $file_id (HTTP 401)"
elif [ "$response" -eq 404 ]; then
    echo "❌ File not found: $file_id (HTTP 404)"
else
    echo "⚠️ Unexpected error deleting $file_id (HTTP $response)"
fi
done
11.2. All File’s Deletion
Delete all uploaded files in one batch operation. Ensure you really want to delete all your uploaded files before running any script in Section 11.2.
11.2.1. All Files Deletion in Python
This Python snippet fetches all file IDs and deletes them in sequence using the Open WebUI API. Ensure you really want to delete all your uploaded files before running this script.
import os
import requests

# Load API key from environment
api_key = os.getenv("MY_OPEN_WEBUI_API_KEY")
if not api_key:
    raise EnvironmentError("Missing MY_OPEN_WEBUI_API_KEY in environment.")

# API upoad endpoint
base_url = "https://openwebui.crc.nd.edu/api/v1/files/"
headers = {"Authorization": f"Bearer {api_key}"}

# Step 1: Fetch all file IDs
response = requests.get(base_url, headers=headers)
if response.status_code != 200:
    raise RuntimeError(f"Failed to fetch files: HTTP {response.status_code}")

file_data = response.json()
file_ids = [file["id"] for file in file_data]

print("Fetched file IDs:", file_ids)

# Step 2: Loop through and delete each file
for file_id in file_ids:
    print(f"Deleting file ID: {file_id}")
    delete_url = f"{base_url}{file_id}"
    delete_response = requests.delete(delete_url, headers=headers)

    if delete_response.status_code == 200:
        print(f"✅ Successfully deleted {file_id}")
    elif delete_response.status_code == 401:
        print(f"🔒 Authentication failed for {file_id} (HTTP 401)")
    elif delete_response.status_code == 404:
        print(f"❌ File not found: {file_id} (HTTP 404)")
    else:
        print(f"⚠️ Unexpected error deleting {file_id} (HTTP {delete_response.status_code})")
11.2.2. All Files deletion in Shell
This shell script retrieves all uploaded file IDs and deletes them. Ensure you really want to delete all your uploaded files before running this script. Save the shell script as ‘delete_all_uploaded_files.sh’.
Ensure your .env file contains a valid MY_OPEN_WEBUI_API_KEY before running the script.
Make the script executable using chmod +x delete_all_uploaded_files.sh.
Run the script from the terminal using ./delete_all_uploaded_files.sh.
File name: delete_all_uploaded_files.sh
#!/bin/bash

# Load environment variables
source .env

# Fetch all file IDs and store them in an array
myfile_ids=$(curl -H "Authorization: Bearer ${MY_OPEN_WEBUI_API_KEY}" https://openwebui.crc.nd.edu/api/v1/files/ | jq -r '.[].id')
myfile_ids_array=($myfile_ids)

echo "Fetched file IDs: ${myfile_ids_array[@]}"

# Loop through each file ID and attempt deletion
for file_id in "${myfile_ids_array[@]}"; do
echo "Deleting file ID: $file_id"

response=$(curl -s -o /dev/null -w "%{http_code}" -X DELETE \
    -H "Authorization: Bearer ${MY_OPEN_WEBUI_API_KEY}" \
    https://openwebui.crc.nd.edu/api/v1/files/$file_id)

if [ "$response" -eq 200 ]; then
    echo "✅ Successfully deleted $file_id"
elif [ "$response" -eq 401 ]; then
    echo "🔒 Authentication failed for $file_id (HTTP 401)"
elif [ "$response" -eq 404 ]; then
    echo "❌ File not found: $file_id (HTTP 404)"
else
    echo "⚠️ Unexpected error deleting $file_id (HTTP $response)"
fi
done
12. Bulk Image Captioning or Description Using Vision Models via Open WebUI API
12.1 Introduction
If you have ever wondered about captioning a folder of images, or having a vision model describe all the images in a folder while still maintaining full control over the process, then you are in the right spot. This is what this Section is about. In this section you will be able to caption or describe images off a folder of images, named ‘myragimages’ and save your description to another output folder. Please feel free to change the input and output folder names or paths in the code.
We have the following vision models on the CRC hosted Open WebUI platform:
llama3.2-vision:latest, llama3.2-vision:90b, llama3.2-vision:11b, granite3.2-vision:latest, qwen2.5vl:32b, qwen2.5vl:7b, qwen2.5vl:latest, qwen2.5vl:72b, minicpm-v:latest, llava:latest, llava:34b, llava-llama3:latest, llava-phi3:latest, moondream:latest
The codes for this task are provided in shell and python in the following sub-sections.
12.2 Bulk Image captioning or description in Python
import os
import base64
import mimetypes
import json
import requests
from pathlib import Path
from dotenv import load_dotenv

# Load environment variables
load_dotenv('.env')

# Load model and query
chosen_model = "granite3.2-vision:latest"  # please change if different
your_query = "Explain what you see in this image."  # please change if different
api_key = os.getenv("MY_OPEN_WEBUI_API_KEY")

# Directories
image_dir = Path("myragimages") # please change if different
output_dir = Path("my_rag_output") # please change if different
output_dir.mkdir(exist_ok=True)

# Image extensions to look for
image_extensions = {".jpg", ".jpeg", ".png", ".tiff"}

# Find all image files
image_paths = [p for p in image_dir.rglob("*") if p.suffix.lower() in image_extensions]

# Loop through each image
for image_path in image_paths:
    print(f"Processing: {image_path}")

    # Encode image to base64
    with open(image_path, "rb") as img_file:
        base64_data = base64.b64encode(img_file.read()).decode("utf-8")

    # Get MIME type
    mime_type, _ = mimetypes.guess_type(image_path)
    if not mime_type:
        mime_type = "application/octet-stream"

    # Build message content
    message_content = [
        {"type": "text", "text": your_query},
        {"type": "image_url", "image_url": {"url": f"data:{mime_type};base64,{base64_data}"}}
    ]

    # Build payload
    payload = {
        "model": chosen_model,
        "messages": [
            {"role": "user", "content": message_content}
        ]
    }

    # Send request
    response = requests.post(
        "https://openwebui.crc.nd.edu/api/v1/chat/completions",
        headers={
            "Authorization": f"Bearer {api_key}",
            "Content-Type": "application/json"
        },
        data=json.dumps(payload)
    )

    # Save response to output folder
    output_file = output_dir / f"response_{image_path.stem}.txt"
    with open(output_file, "w") as out_file:
        out_file.write(response.text)

    print(f"Saved response to {output_file}")
12.2 Bulk Image captioning or description in Shell
#!/bin/bash

# Load API key and model/query
source .env

chosen_model="llama3.2-vision:90b" # modify as desired
your_query="Explain what you see in this image."  # modify as desired

# Create output folder if it doesn't exist
output_dir="ragOutputs"  # modify as desired
mkdir -p "$output_dir"

# Use find to gather all image files (case-insensitive)
image_paths=$(find myragimages/ -type f \( -iname "*.jpg" -o -iname "*.jpeg" -o -iname "*.png" -o -iname "*.tiff" \))  # pls modify input dir - myragimages, as desired

# Loop through each image and send individually
for image_path in $image_paths
do
    echo "Processing: $image_path"

    # Encode image to base64 (single-line)
    base64_data=$(base64 -i "$image_path" | tr -d '\n')

    # Get MIME type
    mime_type=$(file --mime-type -b "$image_path")

    # Build message content
    message_content='[
        {"type": "text", "text": "'"${your_query}"'"},
        {"type": "image_url", "image_url": {"url": "data:'"${mime_type}"';base64,'"${base64_data}"'"}}
    ]'

    # Write payload to file
    cat <<EOF > payload.json
{
"model": "${chosen_model}",
"messages": [
    {
    "role": "user",
    "content": ${message_content}
    }
]
}
EOF

    # Send request
    output_file="${output_dir}/response_$(basename "$image_path" | sed 's/\.[^.]*$//').txt"
    response=$(curl -s -X POST https://openwebui.crc.nd.edu/api/v1/chat/completions \
    -H "Authorization: Bearer ${MY_OPEN_WEBUI_API_KEY}" \
    -H "Content-Type: application/json" \
    -d @payload.json)

    echo "$response" > "$output_file"
    echo "Saved response to $output_file"
done
13. Using Open WebUI based Models alongside other Models in an Application
In the following examples, we will set up a Gradio based UI for incorporating some other sourced information content into a chat interface.
Our chat interface will utilize three models: Google’s Gemini, and two ollama based models - one accessed locally on your machine and the other via Open WebUI API.
13.1 Imports and definitions
import os
from dotenv import load_dotenv
import gradio
import ollama
import google.generativeai
import json
import requests

# Load environment variables
load_dotenv()

# Retrieve API keys from environment variables
owui_api_key = os.getenv("MY_OPEN_WEBUI_API_KEY")
google_api_key = os.getenv("MY_GOOGLE_API_KEY")

# Check and print which keys are set
if owui_api_key and google_api_key:
    print(
        f"You are all set! Your OWUI API Key starts with {owui_api_key[:5]} and your    Google API Key starts with {google_api_key[:6]}."
    )
elif owui_api_key:
    print(f"Only OWUI API Key is set, and it starts with {owui_api_key[:5]}.")
elif google_api_key:
    print(f"Only Google API Key is set, and it starts with {google_api_key[:6]}.")
else:
    print("Cannot find any API Key.")


# Global definitions
system_prompt = "define your system prompt here ..."

model_GEMINI = "gemini-1.5-flash"
Model_on_OWUI = "gpt-oss:120b"
model_ollama = "gemma3:latest"
13.2 Function Definitions
Function definitions are contained in the following python code blocks. These could be saved to a python file.
You will need to define your function, get_other_info(), or exclude it from the following codes.
def chat_via_gemini(system_prompt, user_prompt, model_GEMINI):
    # Create a GenerativeModel instance
    gemini = google.generativeai.GenerativeModel(
        model_name=model_GEMINI, system_instruction=system_prompt
    )

    # Generate content with streaming enabled
    response_stream = gemini.generate_content_stream(user_prompt)  #

    print("Streaming response:")
    try:
        # Iterate through the streamed response and print chunks progressively
        for chunk in response_stream:
            if chunk and hasattr(chunk, "text"):
                print(
                    chunk.text, end="", flush=True
                )  # Print each piece without newline
    except Exception as e:
        print(f"Error while streaming: {e}")


def chat_via_ollama(system_prompt, user_prompt, model_ollama):
    # Initiating the Ollama chat with streaming enabled
    response_stream = ollama.chat_stream(
        model=model_ollama,
        messages=[
            {"role": "system", "content": system_prompt},
            {"role": "user", "content": user_prompt},
        ],
    )

    # Processing and displaying streamed responses
    print("Streaming response:")
    try:
        for chunk in response_stream:
            if "content" in chunk:
                print(
                    chunk["content"], end="", flush=True
                )  # Print streamed content progressively
    except Exception as e:
        print(f"Error during streaming: {e}")


# Interact with the model
def chat_via_owui(system_prompt, user_prompt, Model_on_OWUI):
    url = "https://openwebui.crc.nd.edu/api/v1/chat/completions"
    headers = {
        "Authorization": f"Bearer {owui_api_key}",
        "Content-Type": "application/json",
    }
    payload = {
        "model": Model_on_OWUI,
        "messages": [
            {"role": "system", "content": system_prompt},
            {"role": "user", "content": user_prompt},
        ],
        "stream": True,  # Enable streaming in the API request payload
    }

    try:
        # Make a POST request with streaming
        response = requests.post(
            url, headers=headers, data=json.dumps(payload), stream=True
        )

        # Check if the response is successful
        if response.status_code == 200:
            print("Streaming response:")
            # Process each line of the streamed response
            for line in response.iter_lines(decode_unicode=True):
                if line:  # Skip empty lines
                    try:
                        # Parse the JSON line
                        parsed_line = json.loads(line)
                        # Extract and print the content
                        if "choices" in parsed_line and parsed_line["choices"]:
                            content = parsed_line["choices"][0]["delta"].get(
                                "content", ""
                            )
                            print(content, end="", flush=True)  # Print without newline
                    except json.JSONDecodeError:
                        print("Error decoding JSON from stream.")
        else:
            print(f"Request failed with status code {response.status_code}")
    except requests.RequestException as e:
        print(f"Request exception: {e}")


def get_other_info():
    print("...")
    # write any codes you like here


def ask_model(system_prompt, user_prompt, model):
    other_info = get_other_info(
        user_prompt
    )  # assuming augmenting prompt with some other information. Or using a tool here.
    user_prompt += other_info
    if model == "gemini-1.5-flash":
        # Streaming via Gemini
        chat_via_gemini(system_prompt, user_prompt, model)
    elif model == "gemma3:latest":
        # Streaming via Ollama
        chat_via_ollama(system_prompt, user_prompt, model)
    elif model == "gpt-oss:120b":
        # Streaming via OpenWebUI
        chat_via_owui(system_prompt, user_prompt, model="gpt-oss:120b")
    else:
        print(f"Unknown model '{model}'. Please choose a valid model.")
13.3 Usage in Gradio
Here, all is wrapped up in the following using gradio.
with gradio.Blocks() as ui:
    with gradio.Row():
        myquery = gradio.Textbox(label="Ask your question:", lines=10, value="")
        herresponse = gradio.Textbox(label="Response to your question:", lines=10)
    with gradio.Row():
        model = gradio.Dropdown(
            ["Gemini", "Ollama", "OpenWebUI"],
            label="Select model",
            value="Gemini",
        )
        submitquery = gradio.Button("Submit question")

    # Handle exceptions
    def safe_ask_model(myquery, model):
        try:
            if model == "Gemini":
                ask_model("System Prompt for Gemini", myquery, "gemini-1.5-flash")
            elif model == "Ollama":
                ask_model("System Prompt for Ollama", myquery, "gemma3:latest")
            elif model == "OpenWebUI":
                ask_model("System Prompt for OpenWebUI", myquery, "gpt-oss:120b")
            return "Streaming response displayed in the terminal."
        except Exception as e:
            return f"An error occurred: {e}"

    submitquery.click(safe_ask_model, inputs=[myquery, model], outputs=[herresponse])

ui.launch(inbrowser=True)
14. API Rate Limitations
To help better serve the campus community, we have placed rate limiters on all Open WebUI calls during the week, Monday-Friday. These limitations include:
6 calls per minute
60 calls per hour
If you exceed these limitations, your request will be rejected until the timeframe resets. No permanent blocks will be placed on your account.
Rate limitations are lifted during the weekends, 12:00am Saturday through 11:59pm Sunday.
NOTICE: during high traffic requests periods, the service may become unresponsive. If you are sending a massive amount of context and/or requests per minute, it may result in disruptions to our service. Please be mindful of your request size and frequency as this service is utilized by many researchers on campus!